Pro Program Live Chat +8619050185756

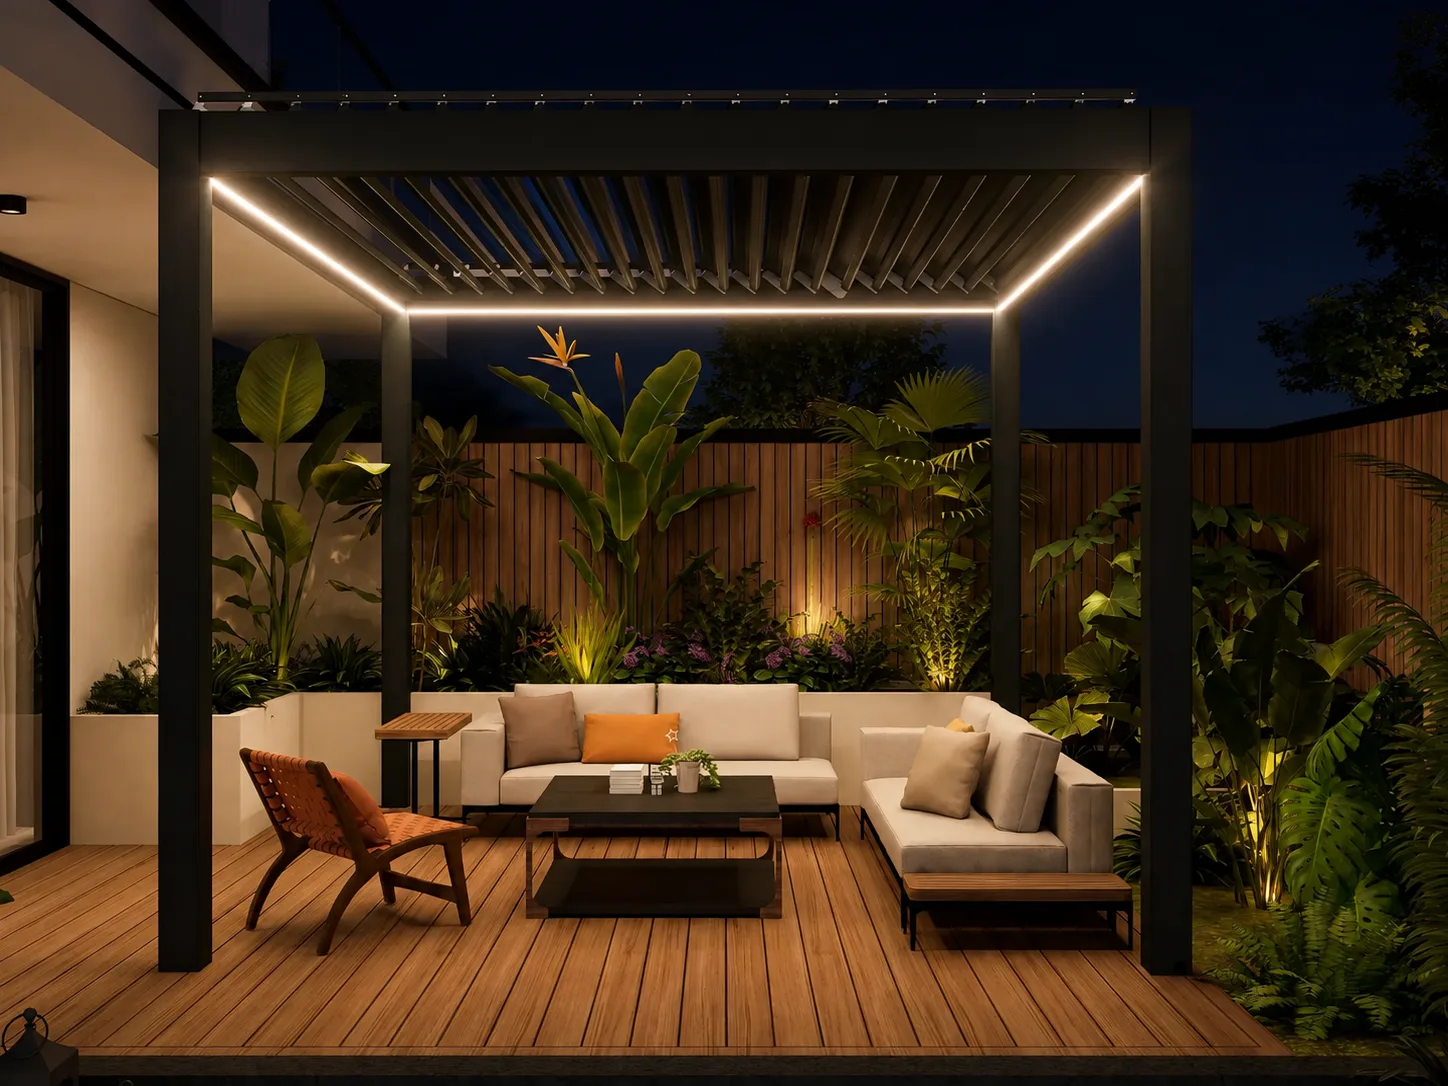
To light a pergola without glare, use several low-intensity layers instead of one bright fixture. Begin with soft, shielded ambient light at the structure, add focused task light only where an activity requires it, and use subtle landscape or path lighting to balance the view beyond the seating area. Keep bright sources out of normal sightlines, choose compatible dimming controls, and test the design from every seat after dark. All electrical components and installation methods must be suitable for their location and completed according to product documentation and local requirements.
Why Glare Happens Under a Pergola
Glare is not simply too much light. It occurs when a bright source contrasts sharply with a darker background or shines directly into a person’s eyes. A bare bulb above a sofa, a downlight aimed at a glossy table, or a bright strip visible from a reclined chair can feel uncomfortable even if the total amount of light is modest.
Outdoor rooms increase the challenge because the surrounding yard may be nearly dark. Eyes adapt to the darker environment, making a concentrated fixture appear brighter. Reflective glass doors, pale paving, metal furniture, and water can also redirect light. A successful plan controls the source, the surface it hits, and the brightness of the background.
Build the Design in Three Layers
1. Ambient light for the room
Ambient light helps people see faces, furniture edges, and the overall space. Integrated linear lighting can outline the pergola and create a calm architectural effect when it is diffused and positioned so the source is not harsh in normal views. The goal is even, comfortable illumination rather than making the pergola as bright as an indoor workroom.
2. Task light for specific activities
Task light belongs where people read, prepare food, serve drinks, or use steps. It should illuminate the work surface without flooding every seat. A focused, shielded fixture can provide useful light at a counter while the lounge remains softer. If a pergola covers cooking equipment, lighting must be coordinated with appliance ventilation, heat, fire-clearance, and manufacturer requirements.
3. Accent and path light beyond the pergola
Low-level landscape lighting reduces the contrast between the pergola and the black yard behind it. A softly illuminated tree, wall, or planting bed gives the eye a comfortable background and makes the outdoor room feel larger. Path and step lighting also supports movement, but fixtures should be shielded so they do not shine toward seated guests or neighboring properties.
Keep the Bright Source Out of Sight
Fixture shielding is one of the most effective glare controls. A light may aim downward, wash a surface indirectly, or sit within a channel that hides the individual diodes from typical viewing angles. Before approving a location, sit in every chair and look up, across the table, and toward the house. Consider both upright and reclined positions.
Pay special attention to lights near the perimeter. A source mounted at eye level can be more distracting than one above. Wall fixtures should direct light where needed rather than sending it horizontally across the patio. Landscape fixtures should be aimed carefully and checked again after plants grow.
Do not alter, drill, or attach accessories to a pergola without confirming that the method is permitted for the selected model. Posts, beams, louvers, gutters, wiring routes, and moving parts must remain accessible and functional. Model-specific documentation controls compatible fixtures and installation details.
Use Dimming and Separate Controls
A single switch forces every occasion to use the same light level. Separate controls allow ambient, task, and landscape layers to respond independently. A dinner may need brighter counter light during preparation, softer overhead light while eating, and only path light later in the evening.
Dimming is useful only when the fixtures, drivers, controls, and wiring are compatible. Incompatible components can flicker, fail to dim smoothly, or behave unpredictably. Have a qualified local professional specify and install the complete system using the exact product documentation. Local authorities determine applicable electrical codes, protective devices, permits, and inspection requirements.
Simple scenes can make the system easier to use. For example, arrival, dining, conversation, and cleanup modes can activate appropriate layers without asking guests to adjust several controls. Avoid controls that are difficult to reach or confusing during everyday use.
Choose a Comfortable Color and Consistent Appearance
Warm-looking light often creates a relaxed residential atmosphere, while task areas may benefit from a neutral appearance that renders food and surfaces clearly. The important design decision is consistency. Mixing visibly different colors within one view can make a premium space feel accidental.
Evaluate samples on the actual materials. Dark aluminum, warm wood, white cushions, stone, and planting foliage respond differently. Photographs and catalog images do not always predict how a source will look on site. Test at night, with the furniture and finishes in place, before committing to many fixtures.
Brightness and color should support the architecture rather than compete with it. The pergola’s lines can be emphasized gently, while landscaping provides depth. Avoid turning every beam, post, plant, and wall into a separate visual feature.
Control Reflections From Tables, Glass, and Water
A light aimed directly at a glossy dining table may create a bright reflection in the eyes of a seated guest. Glass doors can mirror exposed fixtures, and pools can reflect moving highlights. Check these surfaces from the real seating positions. Small changes in fixture position, aiming, shielding, or intensity can make a significant difference.
If the pergola is near a window, look outward from inside the house. Bright exterior fixtures reflected in the glass may obscure the nighttime view. A balanced landscape background and concealed sources usually preserve a clearer connection between indoor and outdoor spaces.
Coordinate Lighting With Louvers and Drainage
A motorized louvered roof has moving components and water-management paths that must not be obstructed. Wiring, channels, fixtures, and controls must be compatible with the exact system. Do not route cables through drainage areas or assume that a sheltered position eliminates exposure to condensation or wind-driven rain.
Plan lighting before installation whenever possible. Early coordination can preserve clean lines and access for future service. It also helps the electrical professional locate supplies, controls, and approved wiring paths without improvised surface work.
Never infer a wind rating, snow rating, weather classification, or code approval from appearance. Structural, electrical, drainage, and installation decisions must follow verified model-specific documentation and qualified local professionals or authorities.
Think About Neighbors and the Night Sky
Outdoor lighting should remain within the property and serve a clear purpose. Shield fixtures downward, avoid aiming across boundaries, and use only the brightness needed. Timers, scenes, or automatic shutoff can prevent the area from remaining fully illuminated after use.
Good lighting reveals paths and gathering areas without making the entire yard uniformly bright. Darker areas between carefully lit elements create depth and preserve a restful atmosphere. This approach usually looks more refined while reducing unwanted spill.
Explore Meta Lifestyle shade structures when planning the lighting concept so any integrated features, wiring routes, and accessory decisions can be checked against the selected pergola’s documentation.
Pergola Lighting Checklist
- Define dining, conversation, reading, cooking, and circulation needs.
- Use ambient, task, and landscape layers instead of one bright source.
- Hide bright emitters from normal seated sightlines.
- Check reflections on tables, glass, metal, and water.
- Control lighting layers separately and confirm dimmer compatibility.
- Test color appearance on actual furniture and finishes.
- Preserve louver movement, drainage, structure, and service access.
- Use components documented for the intended location.
- Aim path and landscape light away from eyes and neighboring properties.
- Have qualified professionals verify electrical work and local requirements.
Frequently Asked Questions
Are integrated pergola lights enough by themselves?
They may provide comfortable ambient light, but the answer depends on the activity and the documented system. Food preparation, steps, and paths may need separate focused lighting. A layered plan usually provides more flexibility than relying on one source.
Where should lights be placed over a pergola dining table?
Position and shield them so the table is useful without placing a bright source in diners’ eyes. Consider the table’s final location, reflections, fixture beam, and views from every seat. Use compatible components and approved attachment methods.
Can lights be added after the pergola is installed?
Possibly, but adding them later can complicate wiring, attachment, drainage, and service access. Confirm compatibility with the exact pergola and have a qualified professional plan the work. Do not drill structural or water-management components without authorization.
Should pergola lighting be warm or cool?
Choose an appearance that suits the architecture and activities, then keep adjacent sources visually consistent. Test samples on site after dark. Comfort, surface colors, and the relationship to indoor lighting matter more than a universal label.
How can I reduce glare from existing lights?
Lower intensity, add approved shielding or diffusion, adjust aiming, and balance the background with subtle landscape light. If electrical or fixture changes are required, use compatible components and qualified professionals.
Do outdoor pergola lights require special electrical protection?
Requirements depend on the fixture, exposure, system, and jurisdiction. Follow the exact product documentation and have qualified local professionals and authorities determine wiring methods, protective devices, permits, and inspections.
Judge the Lighting From the Chair
A lighting plan can look tidy on paper yet feel harsh in use. The final test is the experience from each seat, walking route, indoor window, and neighboring viewpoint. Start with concealed ambient light, add only the task and path light needed, and keep each layer independently controllable. Careful nighttime testing and professional installation create a pergola that feels welcoming without sacrificing comfort, safety, or the quiet character of the yard.