Pro Program Live Chat +8619050185756

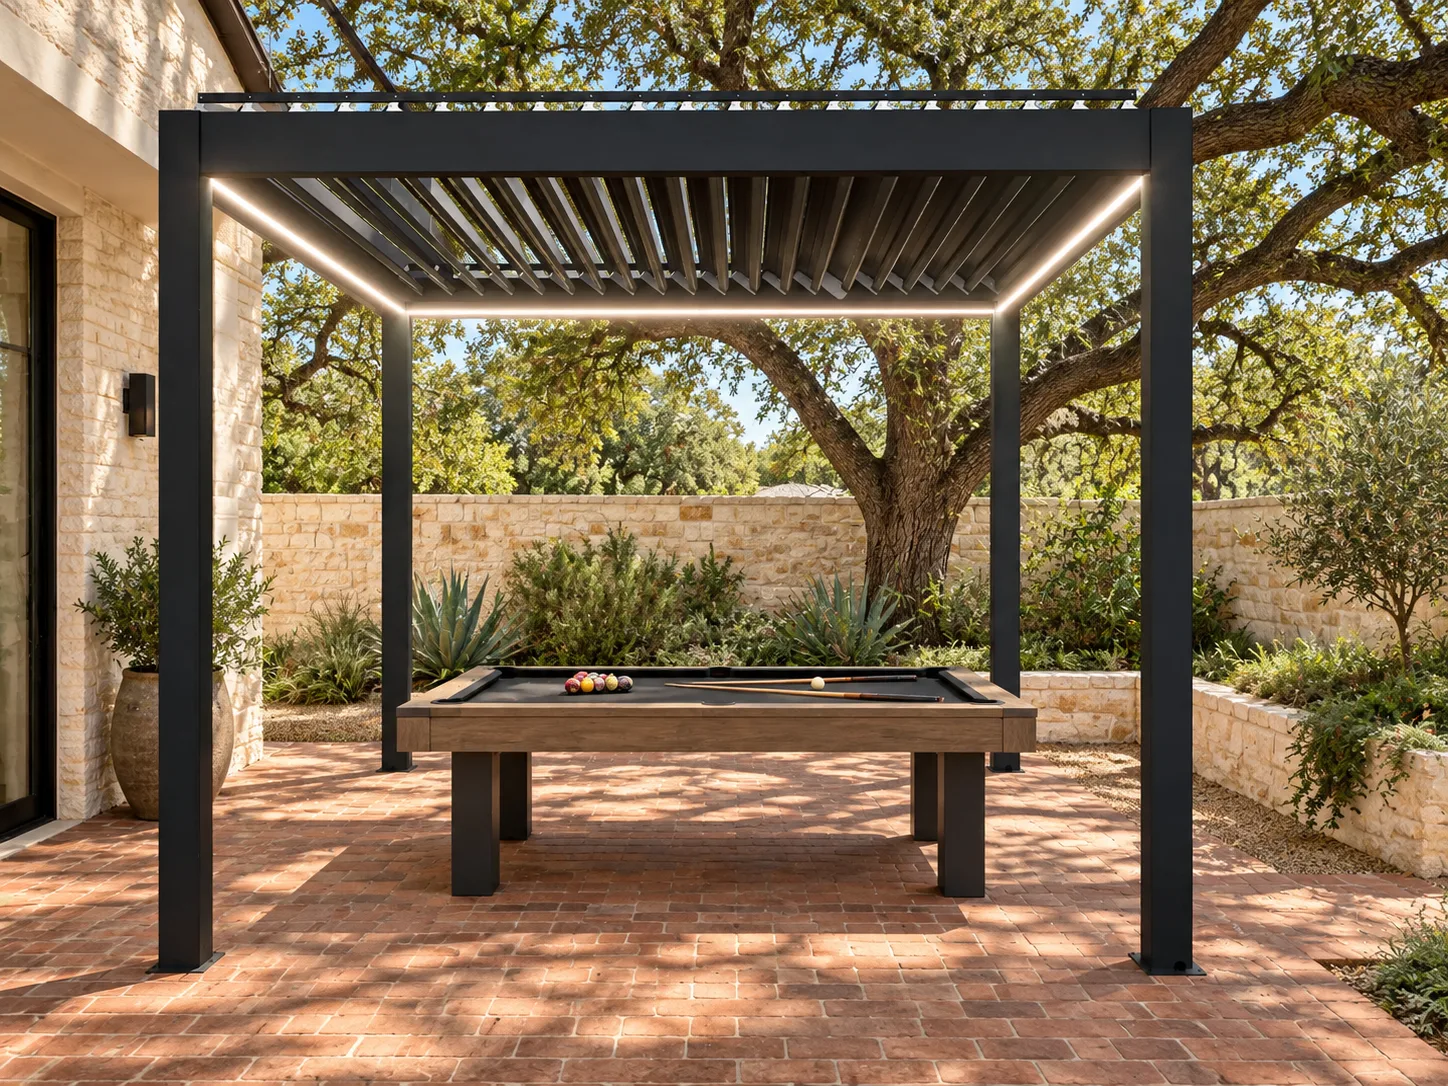
Yes—an outdoor-rated pool table can work under a motorized pergola, but only when the table, floor, clear playing area, weather exposure, and pergola are planned as one system. The pergola can provide adjustable shade and overhead rain management, yet it does not automatically turn an open patio into an indoor game room. The safest buying sequence is to select the actual table, document its overall size and cue clearance, verify the patio’s level and load capacity, then size and position the pergola around that complete playing envelope.
Start With the Game, Not the Structure
“Pool table” describes a category, not one standard footprint. Table dimensions, frame materials, bed construction, leg positions, cover requirements, and maintenance instructions vary. A model intended only for an indoor recreation room should not be assumed suitable outdoors, even beneath a roof.
Choose a table explicitly intended for the exposure level of your patio. Request the manufacturer’s documentation for humidity, temperature, direct sun, wind-driven rain, and storage. If the table needs a cover, include the space and routine for removing, drying, and storing that cover.
Create a true playing envelope
The footprint must include more than the table. Players need room to stand, bend, and move a cue around every side without striking a post, screen, wall, planter, or door. Measure from the outside edge of the table and use the actual cue lengths your household expects to use.
- Mark the tabletop size with painter’s tape or chalk.
- Add the manufacturer’s recommended player clearance on all four sides.
- Place temporary markers where pergola posts and screens would be.
- Simulate shots from corners and the middle of each rail.
- Test the route for delivering and assembling the table.
- Reserve space for cue storage without narrowing the playing zone.
This full-scale mockup often reveals conflicts that are invisible on a small landscape plan.
Put the Posts Outside the Cue Path
A pergola can appear large enough on paper while its posts interrupt two critical corners. Centering the table beneath the roof is not always the best answer. The ideal position balances cue clearance, shade, sightlines, screen operation, drainage, and access from the house.
Ask the pergola provider for dimensioned drawings that show the exact outside footprint, clear inside opening, post size, base plates, motor or control locations, screen tracks, and roof-drainage path. Never move, notch, or modify structural components to gain a few inches. Model-specific documentation and qualified local professionals control structural layout, anchoring, wind and snow design, and permits.
Demand a Stable, Level Playing Surface
A good pool table depends on consistent level. The supporting patio must be stable enough for the combined table and occupant loads without differential settlement. Decorative pavers can look flat while individual units move over time, and a drainage slope that is appropriate for a patio may still affect table leveling.
Have the table manufacturer, installer, and site professional agree on the substrate and allowable slope before construction. The pergola footings or anchors must also be coordinated so they do not conflict with the table base or delivery route. Do not use leveling feet as a substitute for an unsuitable foundation.
Understand What the Louvered Roof Does—and Does Not Do
Motorized louvers can manage sun and provide overhead protection when operated within the product’s instructions. However, open sides allow wind, dust, pollen, humidity, and wind-driven rain to reach the table. Water can also enter when louvers are open or when weather exceeds normal operating conditions.
Review roof drainage, gutter maintenance, and discharge locations. Runoff should not splash onto the table or collect around its feet. In freezing, storm, snow, or high-wind conditions, follow the exact pergola and table manuals. Never imply that a pergola has a particular wind or snow rating without verified model documentation.
Compare Open Sides, Screens, and Walls
| Enclosure approach | Possible benefit | Tradeoff to evaluate |
|---|---|---|
| Fully open sides | Maximum airflow and easy access | Greater exposure to sun angles, dust, pollen, and wind-driven rain |
| Retractable shade screens | Flexible glare, sun, and privacy control | Screen tracks and deployed fabric may reduce cue clearance |
| Purpose-designed weather screens | More protection during suitable conditions | Compatibility, wind limits, ventilation, access, and storage |
| Adjacent permanent wall | Strong protection from one direction | Permits, drainage, lighting, airflow, and constrained playing space |
A screen is not automatically a storm barrier. Confirm its intended use, edge details, operating limits, and compatibility with the exact pergola. Keep exit paths clear and avoid placing loose furniture where a deployed screen needs to travel.
Design Lighting for the Playing Surface
Billiards needs even illumination with limited glare and shadow. General perimeter lighting may create an attractive patio but leave the center of the table unevenly lit. Before adding a dedicated fixture, confirm attachment points, weight, electrical routing, headroom, louver travel, and outdoor rating.
Do not drill into pergola beams or hang a conventional indoor billiard light without written approval. A qualified electrician and the pergola provider should coordinate the exact fixture and controls. Wiring, protective devices, bonding, grounding, and outdoor installation must comply with model documentation and local requirements.
Control Sun, Moisture, and Debris
Low-angle morning or evening sun can reach beneath a roof and fade playing surfaces or heat one side of the table. Observe the site at the hours when games are most likely. Screens, landscaping, or the pergola’s orientation may help, provided they do not obstruct ventilation, drainage, or play.
Leaves and pollen are easier to manage when nearby trees are considered during layout. Keep branches away from the roof mechanism and preserve access for gutter and louver cleaning. Choose furniture and storage that can tolerate the same environment instead of using the table as a shelf.
Plan Delivery Before the Patio Is Finished
A heavy game table may arrive in large components and require specialist assembly. Measure gates, steps, turns, doorways, overhead obstructions, and the route across finished landscaping. If the pergola is installed first, confirm that the table can still pass between posts. If the table arrives first, protect it from construction debris and prevent it from blocking foundation or electrical work.
Ask both suppliers which sequence they recommend and who is responsible for final leveling after the pergola work is complete.
Outdoor Game-Room Planning Checklist
- Select an outdoor-rated table and obtain its full installation manual.
- Confirm table dimensions, cue lengths, and clearance on every side.
- Verify slab or patio capacity, stability, slope, and drainage.
- Place pergola posts outside the complete playing envelope.
- Map screen tracks, motors, controls, downspouts, and service access.
- Study seasonal sun, prevailing wind, rain direction, and tree debris.
- Choose lighting only after confirming pergola compatibility and headroom.
- Reserve dry, accessible storage for cues, balls, covers, and accessories.
- Measure the delivery and replacement route before construction.
- Have qualified local professionals confirm structure, anchoring, electricity, drainage, clearances, and permits.
Browse the META LIFESTYLE shade structure collection for a starting point, then request model-specific drawings that can be coordinated with the selected table and site plan.
Frequently Asked Questions
Can I use an indoor pool table beneath a pergola?
Do not assume so. Open-sided patios expose furniture to humidity, temperature changes, dust, and wind-driven rain. Follow the table manufacturer’s location and environmental requirements; an indoor-only model may not be appropriate.
How much space do I need around the table?
It depends on the table dimensions and cue lengths. Use the table manufacturer’s recommended clearance and test it at full scale. Pergola posts, screens, walls, and storage must remain outside the usable stroke path.
Will closed louvers keep the pool table completely dry?
Not necessarily. Protection depends on the exact roof system, drainage, wind, rain direction, and operating limits. Open sides can admit wind-driven moisture. Use an appropriate table cover and follow both manufacturers’ instructions.
Can a billiard light hang from the pergola?
Only if the exact pergola configuration and fixture are approved for that attachment. Weight, wiring, headroom, louver movement, outdoor exposure, and structural capacity must all be verified before installation.
Should the table be installed before or after the pergola?
The suppliers should coordinate the sequence. Delivery access, anchoring work, construction debris, and final table leveling all matter. Document the agreed route and responsibilities before either product arrives.
How do I request a pergola quote for an outdoor game area?
Send your site dimensions, table specifications, cue lengths, patio construction, photos, screen preferences, electrical location, and delivery route through the META LIFESTYLE Request a Quote page. Both +8619050185756 and +1 (626) 735-5685 are official META LIFESTYLE WhatsApp contacts.
Make Every Shot Comfortable
A successful outdoor billiards area is defined by clear movement, a stable surface, controlled exposure, and equipment that can be maintained. Select the table first, draw the complete playing envelope, and coordinate the pergola around it. That approach creates a game space that looks intentional and remains practical after the first season outdoors.